Using the SlingStudio Console app split screen feature lets you display two, three, or four video sources in one screen. You can also set up a classic picture-in-picture arrangement, in which you can position the secondary video image anywhere on the screen.
To use the split screen feature: - Get your project ready to go, with all sources online:
- Launch the Console app on your iPad.
- Tap a video source so that it appears in Preview.
- Tap the Toolbar. If it is not visible, tap
 in the upper-right corner of the Preview window and select SHOW TOOLBAR.
You see the Toolbar (note that this figure labels each function in red text—you don't see this in the app):
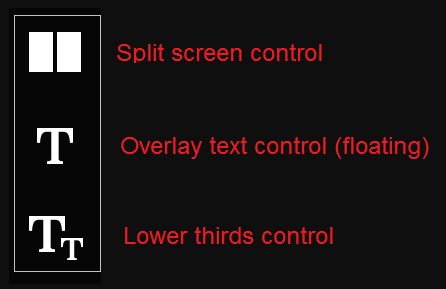
- Tap the split screen icon.
| Control | Options |
| Split screen control | Choose:
-- Whole screen
-- Two columns
-- Three columns
-- Quadrant
-- Picture-in-picture (PIP) |
- Tap the split-screen configuration that you'd like.
- Drag the video sources into the video panes however you want. You can use a video source more than once. You can also leave panes blank, without a video source.
- For the two or three screen options, move the dividing line(s) between screens to the proportions that work best (or leave as is).
- For the picture-in-picture option, resize the secondary image as you wish, and then drag it to any location over the primary image.
- When the images look the way you like, tap the checkmark icon to save. To start over, tap the X icon.
- When you tap Preview -> Program, the split screen arrangement that you've created displays in the program.

